Take a screenshot - Apple Support (IN)
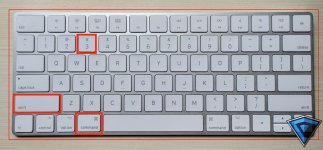
1. Capture the Entire Screen
Press `Command (⌘) + Shift + 3`:
- This will take a screenshot of your entire screen and save it to your desktop.
2. Capture a Selected Portion of the Screen
Press `Command (⌘) + Shift + 4`:
- Your cursor will change to a crosshair.
- Click and drag to select the area you want to capture.
- Release the mouse button to take the screenshot, which will be saved to your desktop.
3. Capture a Specific Window
Press `Command (⌘) + Shift + 4`, then press the `Spacebar`:
- Your cursor will change to a camera icon.
- Move the camera icon over the window you want to capture, which will highlight in blue.
- Click to take the screenshot of the window. The screenshot will be saved to your desktop.
4. Use the Screenshot Toolbar (macOS Mojave and later)
Press `Command (⌘) + Shift + 5`:
- This will open the Screenshot toolbar, which provides options to capture the entire screen, a selected window, or a selected portion.
- The toolbar also includes options for recording your screen and choosing where to save the screenshot.
5. Capture the Touch Bar (for MacBook Pro models with Touch Bar)
Press `Command (⌘) + Shift + 6`:
- This will take a screenshot of the Touch Bar and save it to your desktop.
Additional Tips
- Changing the Save Location: By default, screenshots are saved to your desktop. You can change the save location using the Screenshot toolbar (`Command (⌘) + Shift + 5`) by clicking "Options" and selecting a different save location.
- Clipboard: To save a screenshot to the clipboard instead of a file, add the `Control` key to any of the commands. For example, `Command (⌘) + Control + Shift + 4` will save the selected portion to the clipboard.
References
- [Apple Support: How to take a screenshot on your Mac](https://support.apple.com/en-us/HT201361)
- [Macworld: How to take a screenshot on a Mac](https://www.macworld.com/article/672370/how-to-take-a-screenshot-on-a-mac.html)
These methods should cover all your screenshot needs on a Mac!
Content Unlocked:-
To view the content, you need to Sign In .
